Playwright tips and tricks #3

It's time to have a look under the hood of Playwright and understand a few details that will enhance our skills to be more creative.
1. Get more details about your test during test run
There is a way that you can access some particular values related to your test in real time. Say you have a complex project that has a dynamic configuration based on environments, test-data or whatever other details, and you want to see during test run what particular values are set. You can do that by accessing testInfo object within the test. Here is a snippet of code example to see how to access it:
import { test } from "@playwright/test";

test.describe('test suite name', () => {

  test("test name", async ({ page }, testInfo) => {
    console.log(`test name: ${testInfo.title}`)
    console.log(`parallel index :${testInfo.parallelIndex}`)
    console.log(`shard index: ${JSON.stringify(testInfo.config.shard)}`)
  });
});
Below are some screenshots of other values you can access via testInfo
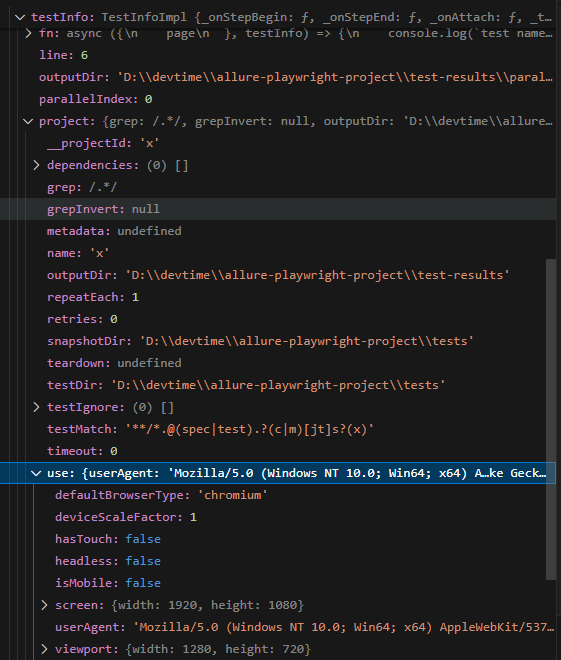
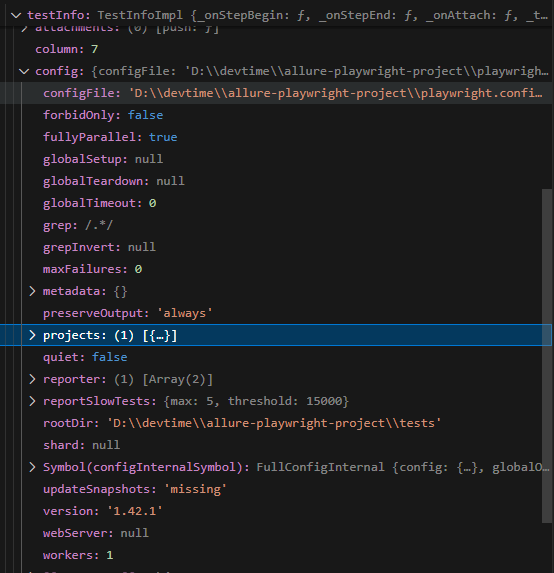
My article about parallelization uses the power of this object to showcase particular values.
2. How to use Playwright to test multiple browser windows ?
Here is a way you can test multiple windows. Not multiple tabs in the same window. But multiple windows, each with its own storage and cookies. A use case would be if your website has implemented chat functionalities, and you want to see if the messages are delivered correctly. You can have two browsers logged in with two users and have them talk with each other. How would we achieve that in Playwright in one single test?
By using our browser and page objects. Here is an example of code
import { test, expect } from "@playwright/test";

test("Two users chat functionalities", async ({ browser }) => {
    // we open two browsers each with its own storage and cookies
    const user1Context = await browser.newContext()
    const user1Page = await user1Context.newPage()
    const user2Context = await browser.newContext()
    const user2Page = await user2Context.newPage()

    // we open the chat
    await user1Page.goto("https://www.yourweb.com/chat")
    await user2Page.goto("https://www.yourweb.com/chat")
    // other login credentials details would go here

    // we start talking with each other in sequence

    await user1Page.getById("input").type("Hello user 2")
    await user1Page.getById("sendMsgBtn").click()

    await expect(user2Page.getByText("Hello user 2")).toBeVisible()
    await user2Page.getById("input").type("Oh ! Hello user 1")
    await user2Page.getById("sendMsgBtn").click()

    await expect(user1Page.getByText("Oh ! Hello user 1")).toBeVisible()

  });
The chat is only an example of course, you can do as you wish in any other scenario you can think of.
3. How Playwright handles multiple tabs in the same browser?
For instance where an element would have a property like target="_blank" that upon clicking it, will open a new tab, then refer to this at playwright docs. If you find it hard to understand the const pagePromise = context.waitForEvent('page') just think of it as an event listener so it will not stop your test, it will just listen. Now right after you perform the click that opens the new tab put const newPage = await pagePromise there and from then on, you can use newPage the same as user2Page from my example above at point 2. Now you can cycle via newPage object or initial page object without the need to do any extra actions. Those of you who have done Selenium remember the switch back and forth with commands such as driver.switchTo().window(actual), no need to do that here anymore. Here you have each page with its own object.
Also if you want to fully understand how to use this trick of "listening" for events such as a new page to open, I advise you pay close attention to point 6. It's not an easy one, but I am sure you will master it after you read the explanation.
Remember that:
browser.newContext() = new window (not yet complete browser, it still needs a tab)
context.newPage() = new tab
Here are more examples to understand. Read the comments please.
import { test } from "@playwright/test";

test("Multiple windows and tabs default way", async ({ page }) => {
  // Default way of using playwright
  // page comes with values about the browser you have setup in config.
  // Ready to go, no need for extra actions.
  // this opens a window (context) and a tab (a page)
  await page.goto("https://duckduckgo.com/")
  });
import { test } from "@playwright/test";
test("Multiple windows and tabs", async ({ browser }) => {
// this creates a new window but you can't perform actions
// with page2Context since its not yet complete, it still needs a tab
const page2Context = await browser.newContext()
// we have a browser, we have a window we only need a tab. You do this:
const page2 = page2Context.newPage()
});Try to mix it up:
import { test } from "@playwright/test";

test("Multiple windows and tabs mix it", async ({ page, context, browser }) => {
  // this opens normally a full browser with window and tab (default way)
  await page.goto("https://duckduckgo.com/")

  // this creates a new tab from the same window (context) as line above
  const page2 = await context.newPage()
  await page2.goto("https://martioli.com/")

  // this sets up a new browser window with a tab.
  // Independent from the lines above
  const page3Context = await browser.newContext()
  const page3 = await page3Context.newPage()
  await page3.goto("https://github.com/adrianmaciuc")
  });
4. How to handle multiple types of browsers inside a test ?
What I want to showcase below is not a way to test multiple browsers. There are far more efficient ways to do that. I am not sure if I will write about that because its fairly simple and the internet is full of such tutorials. But for the sake of getting our hands dirty and understanding how our browser instances are created, see below how you can play with various browsers directly inside your test scope.
import { test , webkit, firefox, chromium } from "@playwright/test";

test("Multiple browser drivers", async () => {
    const browser = await webkit.launch()
    const context = await browser.newContext()
    const page = await context.newPage()
    await page.goto("https://martioli.com/")

    const browser2 = await firefox.launch()
    const context2 = await browser2.newContext()
    const page2 = await context2.newPage()
    await page2.goto("https://martioli.com/")
  });
Notice that there is no more { browser, page } . What happened here is we've pulled the webkit and firefox object inside the test scope. Its a bit of a stretch to do this. But for the purpose of us to understand and maybe develop in the future some creative ideas, it's good to know how it works.
Remember that, in a normal setup where you just use test , and then destructure { page } the object will come with the values about the browser, that you have set inside your playwright config file or with the values that can be set dynamically in a terminal command or a pipeline.
To all JAVA lovers, remember these lines below?
import org.openqa.selenium.chrome.ChromeDriver;

WebDriver driver = new ChromeDriver()
driver.get("https://www.martioli.com")
If you come with background of Java and Selenium then all of my points from above makes sense to you on how to instantiate and handle drivers. And you will also understand that we don't have to write anymore any other lines of code to get our driver object ready to work with. We don't have to, but if we want we still can.
5. Can I override Playwright configurations from within my test ?
We all know that our file called playwright.config holds the configuration and helps us set the project up, and all of our tests will run with those configs. But what if I want to override the configurations only for one test or a suite of tests ?
What if I want a suite of tests to run with a set of configs and another with other set of configs ?
You can do that in two ways:
The simple way. Create a project and have all the use options written for that project
An example for the first option, would be like this
import { defineConfig, devices } from '@playwright/test';

export default defineConfig({
  projects: [
      name: 'whateverNameForProject',
      use: {
        ...devices['Desktop Chrome'],
        colorScheme: 'dark',
        locale: 'fr-FR',
        httpCredentials: {
          username: 'yourUser',
          password: 'yourPass',
        },
        testIdAttribute: 'data-testid',
      }
    // any other config you would like goes here
  ],
});
Whenever you run your tests it will by default run all tests against all projects. So be sure to specify which project you want to run with --project=whateverNameForProject
The dirty way. Override config values from within your tests
For the second option, imagine that you want a particular test suite or a spec file to have tests with a special setting for geolocation or viewports, maybe a test has some simple login credentials you have to bypass. In other words, whatever you see here, any of these values can be manipulated inside our tests. This is how you do it
import { test } from "@playwright/test";

test.use({
    geolocation: { longitude: 36.095388, latitude: 28.0855558 },
    userAgent: 'my super secret Agent value'
  })

test("Override config", async ({ page }) => {
    await page.goto("https://martioli.com/")
})
This will keep the rest of the settings and just override what you need.
Easter Egg -> let me know the name of the location I used here in the geolocation and you shall win the title as my golden reader
If you want to have in the same spec file, multiple suites that each come with their own extra config you can do like this
import { test, expect, webkit, firefox, chromium } from "@playwright/test";

test.describe('Override suite 1', () => {
  test.use({
    viewport: { width: 400, height: 810 },
    geolocation: { longitude: 36.095388, latitude: 28.0855558 },
    userAgent: 'my super secret Agent value'
  });

  test("Override test 1", async ({ page }) => {
    await page.goto("https://martioli.com/")
  })

});

test.describe('Override suite 2', () => {
  test.use({
    viewport: { width: 768, height: 1024 },
    geolocation: { longitude: 36.095388, latitude: 28.0855558 },
    userAgent: 'my second super secret Agent value nr 2'
  });

  test("Override test 2", async ({ page }) => {
    await page.goto("https://martioli.com/")
  })

});
If you want the same override config at spec file level, just move the test.use() at the top of the page and it will apply to all the suites inside the file.
Configurations can be also done via globalSetup. Its a more elegant and advanced way of doing things. I will probably do a blog post about it in the future.
Not that elegant but still another way to do it, you can pass in configuration override using context.
import { test, devices } from "@playwright/test";

test("Override test 1", async ({ browser }) => {
  const context = await browser.newContext({
    ...devices['iPhone 13'],
    isMobile: true
  })
  const page = await context.newPage()
  await page.goto("https://martioli.com/")
})
6. Promise.all in Playwright
I want to address this because I keep seeing people doing their projects with Playwright and some do not fully understand when to use Promise.all() in Playwright. I am going to copy paste the best explanation below (not my words):
I'll use the waitForResponse() method to showcase
Let's say, we have a Search Input field and a button that triggers the search, eventually making a request to an API (https://example.com/api/search, the search term is in the request body)
You would probably write something like this
await page.locator("button").click() // search button

await page.waitForResponse("https://example.com/api/search")
With the above code, there's a (high) chance that we already received a response from https://example.com/api/search before we reached the await page.waitForResponse("https://example.com/api/search") line. The .click() method doesn't resolve immediately, but performs a range of (time-consuming) steps before resolving the await promise and continuing to the next line.
Await executes code asynchronous in sequence, one after another.
What we want here is for await page.locator("button").click() and await page.waitForResponse("https://example.com/api/search") to be executed at the same time - so that both can do their job properly.
That's where Promise.all() comes into play.
Promise.all() executes promises concurrently, meaning,
const [response] = await Promise.all([
  page.locator("button").click(),
  page.waitForResponse("https://example.com/api/search")
]);
Executes both .click() and .waitForResponse() at the same time. The await Promise.all() as a whole only resolves when all of its argument promises passed. The issue we've noticed here is called race condition.
Many Playwright events (.waitForRequest(), .waitForResponse(), .waitForEvent(), ...) must execute concurrently with their triggers using Promise.all.
Here is a link to the explanation in full, thanks to advename
Hit the clap button if you found this useful. Or even buy me a coffee if you want to motivate me even more.
Feel free to checkout other nice tips:


Comments ()